
Save Money, Save Your Dog.
Join Our Email List For Discounted Pricing and a Free Guide to the Science of Keto Dog Food.
A Step-By-Step Guide to Using a Continuous Glucose Monitor (CGM) With Your Dog
As I've recently explained, continuous glucose monitors (CGMs) are true game-changers for managing diabetes in dogs and cats. They are meaningful improvements on traditional glucometers in two distinct ways: (1) they don't require blood draws and (2) they measure glucose continuously, not at a single moment in time. Easier, less stressful, and much more informative. What's not to love?
Well, for one, canine-specific CGMs don't yet exist. So if you want to use one with your dog, you're going to need to talk a doctor or veterinarian into prescribing a human-use device for off-label use. Then you're going to need to pick up a few other items that'll be necessary for canine use. And, last but not least, you're going to go through a bit of a process getting it all up and running.
And that's where I come in. I've recently overcome all these obstacles and lived to tell the tale. Which is precisely what I intend to do here. In this article, I'm going to walk you through the entire process of procuring and using a CGM with your dog. As you'll see, it really boils down to just a few key steps. And I promise you that the results are very much worth the effort.

Naish, our fearless CGM guinea pig.
Step One: Choose the Right Device
As of writing, at least three different CGMs have been FDA approved for use with human subjects: the Dexcom G6, the Eversense, and the Freestyle Libre II.
A 2018 study found that all three devices were quite accurate when used with human subjects, although the Dexcom performed somewhat better than the others. The other strengths of weaknesses of the three devices were also evaluated here.
Crucially, to my knowledge the Freestyle Libre is the only device that has been systematically tested with dogs, as opposed to people. (Here's a link to the 2016 study in which researchers from the University of Bologna found the Libre to obtain accurate glucose measurements in dogs.) So, in my eyes, that's the best choice for diabetic pet parents, at least for now.
Step Two: Get a Prescription From Your Doctor or Veterinarian.
While studies show that human-use CGMs measure canine glucose levels accurately, at this point the devices have only been approved by the FDA for use with people, not with dogs. And, because they're medical devices, they're only available with a prescription.
Taken together, what this means is you'll have to obtain an "off-label" prescription from either your doctor or veterinarian in order to get your hands on a CGM. Not to worry, as the AVMA explains here, the practice of prescribing human-use drugs and devices for use with animals is perfectly legal, so long as the circumstances are appropriate.
Prescribing a human-use CGM for use with a dog is a particularly low-risk off-label situation. There's evidence showing that human-use CGMs work well with dogs; unlike some prescription drugs, there's no potential for abusing CGMs; and the devices represent huge upgrades on the glucometers typically used by pet parents to manage their diabetic dogs.
I'd be shocked if you faced any push-back whatsoever from your vet. I certainly didn't.
Step Three: Pick Up the Other Tools You'll Need
CGMs are applied directly to the skin. We humans typically apply them to the back of our upper arms, a spot where there isn't much hair to worry about. If you want to use a CGM with your dog, however, you're going to have to contend with hair.
More specifically, you're going to need to clear the hair from a few square inches of skin. In order to do this, you'll probably want to grab two pieces of equipment.
The first is something to clear the hair. Scissors and a shaving razor might do the trick. But Naish is a St. Bernard and his hair is obscenely long and thick. So I opted to spring for some electric clippers. They worked phenomenally well and I highly recommend them for owners of long-haired breeds.

Wahl clippers purchased from Amazon.
The second thing you'll want is a can of medical-grade adhesive spray. I learned this the hard way: the sticky material on the back of the sensor isn't particularly heavy-duty and Naish's first sensor fell off almost immediately (as I explain below, this is a pretty big deal).
Not to worry; apparently vets encounter this problem all the time. Mine was quick to recommend a spray-on adhesive that helps all sorts of medical things stick to stubbly dog skin. I found one online and it worked like a charm.

Spray-on medical adhesive and alcohol swabs for cleaning the application site.
Step Four: Unbox the Device
If you opt for the Freestyle Libre II, your pharmacist will be giving you four boxes at a time. Each device is composed of a few different component parts, so the four boxes actually contain only two CGMs, not four. Each one is good for 14 days, assuming no screw-ups. So you get about a month's worth of glucose monitoring with each prescription.
Here's what you'll find inside the boxes:

Contents of the two boxes in the top row (from left to right): Instructions, monitor, sensor applicator, sensor (under sealed lid), more instructions.
Each of the individual constituent parts plays an important role in the operation of the device. The applicator is used to apply the sensor to your dog, the sensor measures glucose levels and transmits that data to the monitor, and the hand-held monitor presents that data on a screen in a format that you can read and evaluate.
The in-box instructions are clear and straightforward. Even though they describe use with human beings, not dogs, they're easy enough to translate.
Step Five: Apply the Device to Your Dog
This is actually four separate mini-steps.
First, pick a spot for the sensor. You're looking for one that's difficult for your dog to reach and that will stay relatively still when she moves around. Most veterinary resources that I found recommend something near the center of the back, behind the front legs and a few inches off the spine. So that's what I chose.

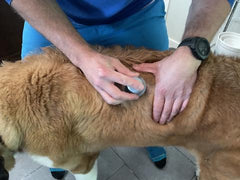
Second, shave a spot that's large enough for the sensor -- a few square inches should do the trick. I used the electric clippers without a guard for the heavy lifting and then finished things off by clearing the remaining stubble with a shaving razor.
Third, clean the skin with your alcohol swabs and apply some of your adhesive spray, giving it all a chance to partially dry before moving on.
Fourth, use the applicator to apply the sensor. This is the crux of the process and, as I learned first hand, if you screw it up you'll have to start all over with a new device. (And since you only get two devices with each prescription, that's half your glucose monitoring down the drain.) So don't screw it up! This means holding the applicator in place for ten or fifteen seconds after you apply the sensor. This will give the adhesive a chance to set and reduce the likelihood that your sensor falls off.

And that's really it. Voila! Your dog is now wearing a continuous glucose monitor.
If you're using the Freestyle Libre II, you'll have to give the sensor about an hour to get acclimated before you can start transmitting data to the monitor. But otherwise that's all there is to it.
Of course, this is where things really start to get interesting. What kind of levels should you expect? How do different foods and other stimuli impact your dog's glucose?
That's all going to depend on your individual dog and her individual circumstances. But, to give everyone a frame of reference, I'm also planning to run a bunch of different experiments with Naish over the weeks ahead. Just so I can give readers a better idea of what to expect. So stay tuned, I'll have more coming soon. Thanks for reading.
Related Articles
How Much Does The Farmer’s Dog Really Cost?
5 Signs and Symptoms That Your Dog May Have Diabetes
Learning to Take Pleasure In Being Your Dog's Play Buddy-Drill Sargeant
Dogs, Dog Food and Dogma - A Book About America's Pet Obesity Epidemic
Browse Articles By Category